上周ChatGPT发布,每个人都在尝试惊人的事情。我也开始玩它,并想尝试如何使用 AWS 的 AI 服务进行集成,结果是:一点问题没有!
在这篇文章中,我将逐步解释我是如何创建这个项目的,以便您也可以这样做!
最重要的是,您无需成为AI专家即可创建此内容!
我假设您已经知道 ChatGPT 是什么,并且有一个帐户可以使用 AWS。如果您不知道 ChatGPT 是什么,请在此处查看 ChatGPT 是什么以及如何自己尝试。可以在此处找到此项目的完整代码。
开源项目地址
 Robertgv / chatgpt-aws

ChatGPT + AWS
上周ChatGPT发布,每个人都在尝试惊人的事情。我也开始玩它,并想尝试如何使用 AWS 的 AI 服务进行集成,结果是 AWSome!
详细步骤

我将这个项目分为 8 个步骤:
- 录制音频并将其保存为 WAV 格式
- 将音频文件上传到亚马逊 S3
- 使用 Amazon Transcribe 转录并识别保存在 S3 中的音频的内容
- Amazon Transcribe 将转录结果保存在 Amazon S3 中
- 将转录发送到 ChatGPT
- 从 ChatGPT 接收文本答案并提交Amazon Polly
- 使用 Amazon Polly 将检测到的语言将文本转换为音频,并以 MP3 格式下载音频
- 播放应答音频文件
在开始之前,我们需要定义您需要在以下代码中创建并稍后替换的常规参数。后续步骤将解释此凭据的创建。
# ChatGPT params
chatGPT_session_token = "<SESSION-TOKEN>"

# AWS params
aws_access_key_id = "<ACCESS-KEY-ID>"
aws_secret_access_key = "<SECRET-ACCESS-KEY>"
aws_default_region = "<AWS-REGION>"
aws_default_s3_bucket = "<S3-BUCKET>"

# Voice recording params
samplerate = 48000
duration = 4 #seconds
1.录制音频并将其保存为WAV格式
首先,我们需要录制音频,我们将在其中提出我们希望 ChatGPT 回答的问题。为此,我们将使用声音硬件设备。确保您在操作系统的默认配置中选择了正确的麦克风。 在这种情况下,它将录制语音的时间是 4 秒。 如果您想增加或减少此时间,只需修改参数持续时间的值。
该脚本会将音频保存在当前工作目录中名为 audio 的文件夹中。如果此文件夹不存在,它将使用 os 模块创建它。
def record_audio(duration, filename):
    print("[INFO] Start of the recording")
    mydata = sd.rec(int(samplerate * duration), samplerate=samplerate,channels=1, blocking=True)
    print("[INFO] End of the recording")
    sd.wait()
    sf.write(filename, mydata, samplerate)
    print(f"[INFO] Recording saved on: {filename}")

#Check if folder "audios" exists in current directory, if not then create it
if not os.path.exists("audio"):
    os.makedirs("audio")

# Create a unique file name using UUID
filename = f'audio/{uuid.uuid4()}.wav'

record_audio(duration, filename)
2. 将音频文件上传到亚马逊 S3
在此步骤中,首先我们需要创建一个 Amazon S3 存储桶。为此,我们转到AWS控制台并搜索服务Amazon S3。然后单击创建存储桶。
我们需要输入存储桶的名称(存储桶名称在所有 AWS 区域的所有 AWS 账户中必须是唯一的),然后选择 AWS 区域。

其余的参数我们可以将它们保留为默认值。最后,单击页面底部的创建存储桶。
在参数部分,我们需要从一开始就将此值替换为存储桶名称和所选区域:
aws_default_region = "<AWS-REGION>"
aws_default_s3_bucket = "<S3-BUCKET>"
下一步是创建一个新用户,我们将使用该用户使用 boto3 访问此 S3 存储桶。Boto3 是 Python 的 Amazon Web Services (AWS) Software Development Kit (SDK),它允许 Python 开发人员编写利用 Amazon S3 和 Amazon EC2 等服务的软件。
要创建新用户,我们在 AWS 控制台上搜索 IAM。然后单击 “访问管理”下左侧菜单上的 “用户”:

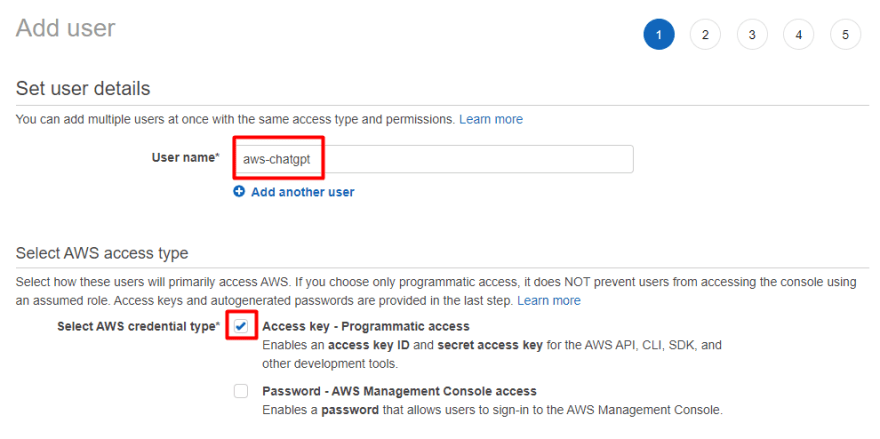
单击右上角的添加用户。我们需要提供一个用户名,然后单击访问键 – 编程访问复选框。
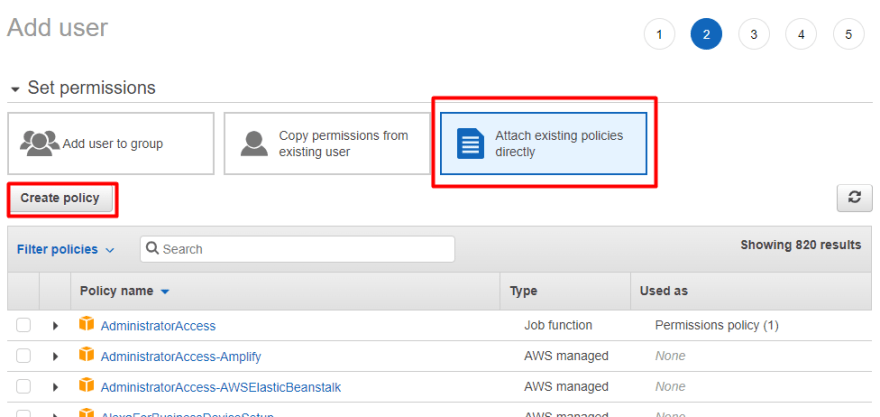
然后单击下一步 :权限。在此处单击“直接附加现有策略”,然后单击“创建策略”。
在这里我想提一下,我们可以选择名为AmazonS3FullAccess的策略,它可以工作,但这违背了最小特权权限的原则。在这种情况下,我们将只提供对我们之前创建的存储桶的访问权限。
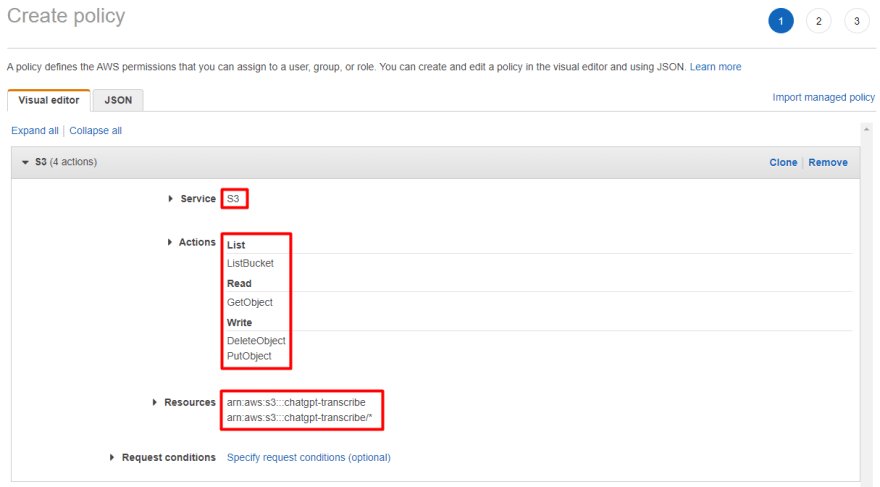
在创建策略页面上,单击选择服务并搜索 S3 并单击它。然后在 “操作” 上单击选项:
- 列表桶
- 获取对象
- 删除对象
- 放置对象
在资源上单击特定,然后在存储桶上单击添加 ARN,输入我们之前创建的存储桶名称,然后单击添加。在对象上,还要单击添加 ARN 并输入之前创建的存储桶名称,在对象名称上单击复选框任意。
然后单击下一步:标签和下一步:查看。最后,为新策略命名,然后单击“创建策略”。
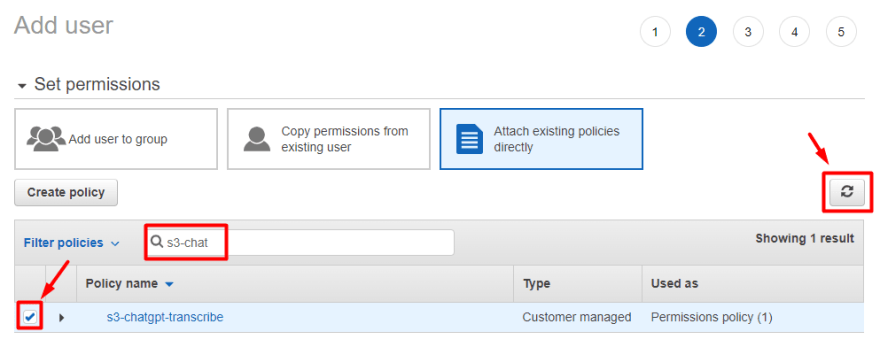
创建策略后,返回到用户页面的创建并搜索创建的新策略。如果未出现,请单击刷新按钮。
然后单击下一步:标签和下一步:查看。最后,查看一切正常,然后单击创建用户。
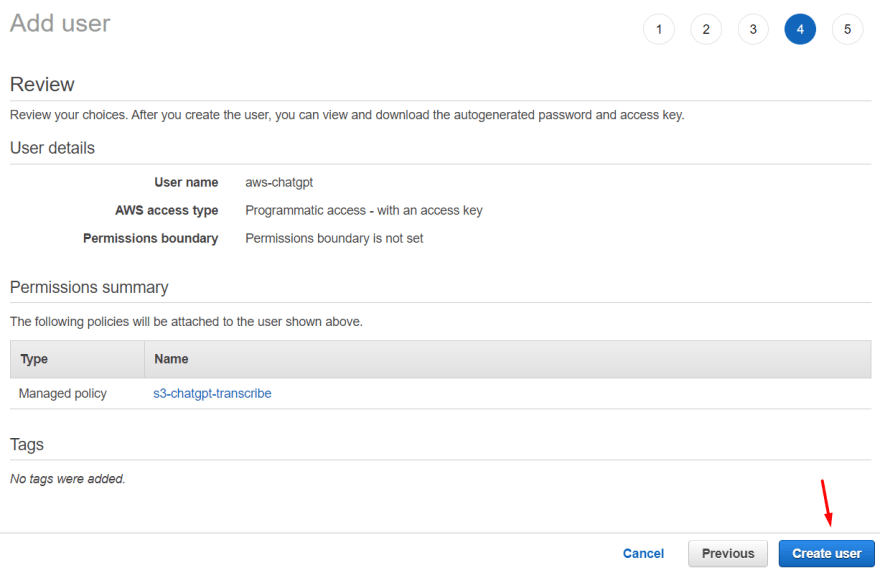
在下一页上,我们将获得访问密钥 ID 和秘密访问密钥。确保保存它们(特别是秘密访问密钥)并且不要共享它们。在参数部分,我们需要替换以下值:
aws_access_key_id = "<ACCESS-KEY-ID>"
aws_secret_access_key = "<SECRET-ACCESS-KEY>"
这样,我们就有一个用户有权写入之前创建的 S3 存储桶。
# Connect to Amazon S3 using Boto3
def get_s3_client():
    return(boto3.client('s3', region_name=aws_default_region, aws_access_key_id=aws_access_key_id, aws_secret_access_key=aws_secret_access_key))

def upload_file_to_s3(filename):
    s3_client = get_s3_client()
    try:
        with open(filename, "rb") as f:
            s3_client.upload_fileobj(f, aws_default_s3_bucket, filename)
            print(f"[INFO] File has been uploaded successfully in the S3 bucket: '{aws_default_s3_bucket}'")
    except:
        raise ValueError(f"[ERROR] Error while uploading the file in the S3 bucket: '{aws_default_s3_bucket}'")

upload_file_to_s3(filename)
3-4. 使用亚马逊转录转录并检测保存在 S3 中的音频的语言
Amazon Transcribe 是一项 AWS 人工智能 (AI) 服务,可让您轻松地将语音转换为文本。使用自动语音识别 (ASR) 技术,您可以将 Amazon Transcribe 用于各种业务应用程序,包括转录基于语音的客户服务呼叫、在音频/视频内容上生成字幕以及对音频/视频内容进行(基于文本的)内容分析。
为了能够将 Amazon Transcribe 与在上一步中创建的 IAM 用户一起使用,我们需要通过 IAM 策略提供对它的访问权限。
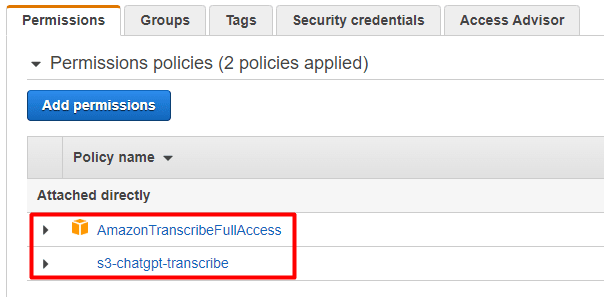
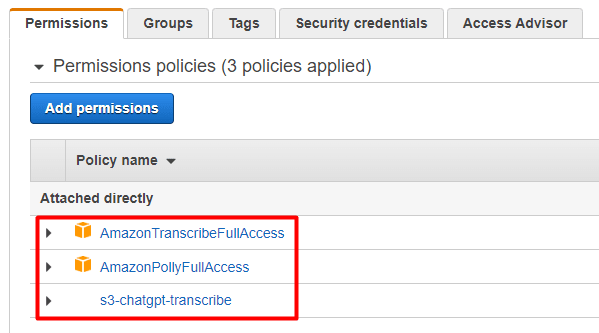
为此,我们需要转到AWS控制台中的IAM,单击左侧菜单中的用户,然后单击之前创建的用户。 单击“添加权限”,然后单击 “直接附加现有策略”。搜索 AmazonTranscribe 并
单击 AmazonTranscribeFullAccess 复选框。

单击“下一步:查看并添加权限”。
此时,此用户应附加 2 个策略:
添加此额外权限后,**您无需修改/更新访问密钥 ID 或秘密访问密钥。
在下面的 python 代码中,我们通过 boto3 软件包使用 Amazon 转录将音频中录制的语音转录为文本。Amazon Transcribe 还会检测音频中使用的语言。
在这里,您可以在 boto3 文档中阅读有关转录服务的所有文档。
转录保存在 Amazon S3 的 JSON 文件中。您可以选择将成绩单保存在您自己的 Amazon S3 存储桶中,也可以让 Amazon Transcribe 使用安全的默认存储桶。就我而言,我选择拥有的 Amazon S3 存储桶上的默认选项。 如果我们选择默认选项,则在作业到期(90 天)时将删除成绩单。如果我们想将成绩单保留在此到期日期之后,则必须下载它。
# Generate UUID for the job id
job_id = str(uuid.uuid4())

# Connect to Amazon Transcribe using Boto3
def get_transcribe_client():
    return(boto3.client('transcribe', region_name=aws_default_region, aws_access_key_id=aws_access_key_id, aws_secret_access_key=aws_secret_access_key))

def get_text_from_audi(filename):
    transcribe = get_transcribe_client()
    print("[INFO] Starting transcription of the audio to text")
    transcribe.start_transcription_job(TranscriptionJobName=job_id, Media={'MediaFileUri': f"https://{aws_default_s3_bucket}.s3.{aws_default_region}.amazonaws.com/{filename}"}, MediaFormat='wav', IdentifyLanguage=True)
    print("[INFO] Transcribing text: *",end="")
    while True:
        status = transcribe.get_transcription_job(TranscriptionJobName=job_id)
        if status['TranscriptionJob']['TranscriptionJobStatus'] in ['COMPLETED', 'FAILED']:
            break
        print("*",end='')
        time.sleep(2)
    print("") #End of line after loading bar
    if status['TranscriptionJob']['TranscriptionJobStatus'] == 'COMPLETED':
        response = urllib.request.urlopen(status['TranscriptionJob']['Transcript']['TranscriptFileUri'])
        data = json.loads(response.read())
        language_detected = data['results']['language_identification'][0]['code']
        transcript = data['results']['transcripts'][0]['transcript']
        print(f"[INFO] Transcription completed!")
        print(f"[INFO] Transcript language: {language_detected}")
        print(f"[INFO] Transcript text: {transcript}")
        return(transcript, language_detected)
    else:
        raise ValueError("[ERROR] The process to convert audio to text using Amazon Transcribe has failed.")

transcript, language_detected = get_text_from_audi(filename)
5. 将转录发送到 ChatGPT
收到来自 Amazon Transcribe 的成绩单后,我们需要将其发送到 ChatGPT。为此,我正在使用revChatGPT包。要使用此软件包,我们需要向 ChatGPT 进行身份验证,这可以使用用户名和密码 或使用 session_token来完成。就我而言,因为我使用的是谷歌OAuth身份验证方法,所以我将使用session_token。
要获取会话令牌,我们需要登录 ChatGPT,然后单击 F12 或右键单击并检查。然后搜索“应用程序”选项卡,并在左侧菜单中搜索 Cookie。选择网站 chat.openai.com,然后搜索名称为 __Secure-next-auth.session-token 的 Cookie,并复制此 Cookie 的值。
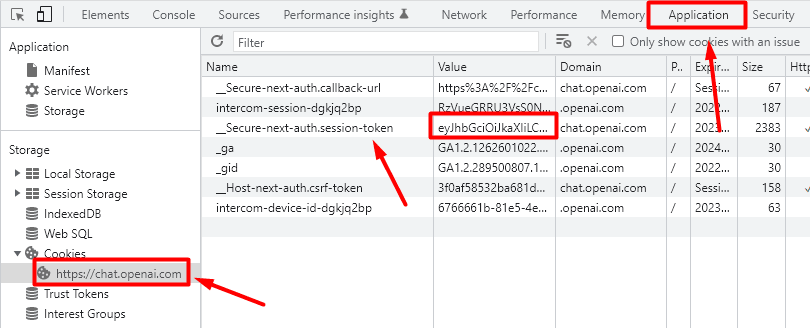
在一开始的参数部分中,我们需要将此值替换为您拥有的会话令牌值:
chatGPT_session_token = "<SESSION-TOKEN>"
如果您想使用电子邮件和密码作为身份验证方法,您可以在此处查看有关如何执行此操作的步骤。
完成此操作后,我们应该能够使用 Python 连接到 ChatGPT。
def get_gpt_answer(prompt):
    print(f"[INFO] Sending transcript to ChatGPT")
    config = {"email": "<API-KEY>","session_token": chatGPT_session_token}
    chatbot = Chatbot(config, conversation_id=None)
    chatbot.refresh_session()
    response = chatbot.get_chat_response(prompt, output="text")["message"]
    print(f"[INFO] ChatGPT answer: {response}")
    return(response)

chatgpt_answer = get_gpt_answer(transcript)
6. 从 ChatGPT 接收文本答案并删除冗余回复内容
一旦我们从 ChatGPT 得到答案,我们就会得到一个或多个回话文本。在这种情况下,我正在应用正则表达式函数来删除不用内容。
在这里,您还可以添加自己的规则,了解如何从 ChatGPT 中过滤或清除答案。
def clean_audio_text(text):
    # Clean the code chuncks from the audio using regex
    result = re.sub(r"```

[^Srn]*[a-z]*n.*?n

```", '', text, 0, re.DOTALL)
    return(result)
7. 使用 Amazon Polly 使用步骤 3 中检测到的语言将文本转换为音频,并以 MP3 格式下载音频
Amazon Polly 使用深度学习技术合成听起来自然的人类语音,因此我们可以将文本转换为语音。
从 ChatGPT 清除答案后,我们准备将其发送到 Amazon Polly。
为了能够将 Amazon Polly 用于之前创建的用户,我们需要使用策略提供对它的访问权限,就像我们在上一步中使用 Amazon Trancri 所做的那样。
为此,我们需要转到AWS控制台中的IAM,单击左侧菜单中的用户,然后单击之前创建的用户。 然后单击“添加权限”,然后单击 “直接附加现有策略”。搜索 AmazonPolly,然后单击 AmazonPollyFullAccess 复选框。
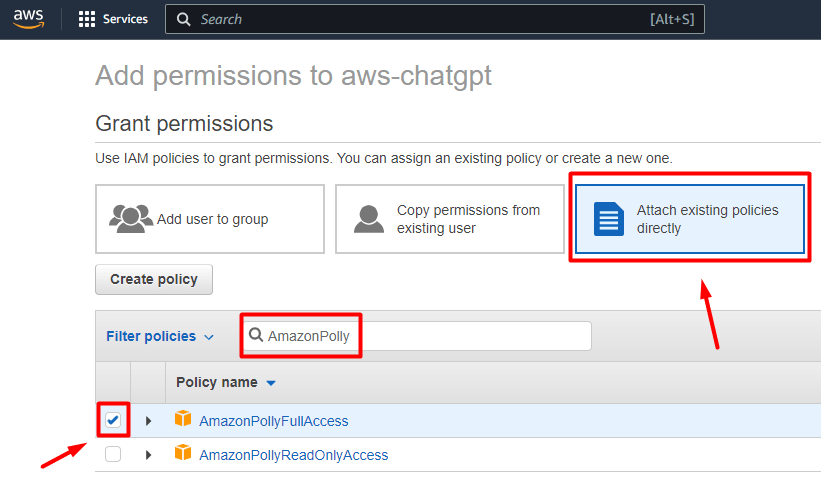
单击“下一步:查看并添加权限”。
此时,此用户应附加 3 个策略:
Amazon Polly 支持多种语言和不同的性别。在这种情况下,我提供的代码预定义了 3 种语言:英语、西班牙语和加泰罗尼亚语。另外,请注意,对于每种语言,您可以根据国家/地区有不同的变体。例如,对于英语,我们有en-US,en-GB,en-IN等。****
此处提供了所有可用语言和变体的完整列表。
将文本发送到 Amazon Polly 后,我们将收到包含合成语音的流。
def get_polly_client():
    return boto3.client('polly', region_name=aws_default_region, endpoint_url=f"https://polly.{aws_default_region}.amazonaws.com", aws_access_key_id=aws_access_key_id, aws_secret_access_key=aws_secret_access_key)

def generate_audio(polly, text, output_file, voice, format='mp3'):
    text = clean_audio_text(text)
    resp = polly.synthesize_speech(Engine='neural', OutputFormat=format, Text=text, VoiceId=voice)
    soundfile = open(output_file, 'wb')
    soundBytes = resp['AudioStream'].read()
    soundfile.write(soundBytes)
    soundfile.close()
    print(f"[INFO] Response audio saved in: {output_file}")

def get_speaker(language_detected):
    # Get speaker based on the language detected by Amazon Transcribe (more info about available voices: https://docs.aws.amazon.com/polly/latest/dg/voicelist.html)
    voice = ""
    if language_detected == "en-US":
        voice = "Joanna"
    elif language_detected == "en-GB":
        voice = "Amy"
    elif language_detected == "en-IN":
        voice = "Kajal"
    elif language_detected == "ca-ES":
        voice = "Arlet"
    elif language_detected == "es-ES":
        voice = "Lucia"
    elif language_detected == "es-MX":
        voice = "Mia"
    elif language_detected == "es-US":
        voice = "Lupe"
    else:
        voice = "Joanna"
        print(f"[WARNING] The language detected {language_detected} is not supported on this code. In this case the default voice is Joanna (en-US).")
    print(f"[INFO] Speaker selected: {voice}")
    return(voice)

polly = get_polly_client()
voice = get_speaker(language_detected)
output_file = f"audio/{job_id}.mp3"
generate_audio(polly, chatgpt_answer, output_file,voice=voice)
8.播放应答音频文件
最后,我们只需要播放来自亚马逊波莉的音频结果。
根据操作系统或您运行此内容的位置,它可能无法正常工作。就我而言,当我在macOS中从终端运行功能speak_script(output_file) 时,它可以工作。如果您使用的是像Jupyter Notebook这样的笔记本,请使用speak_notebook(output_file) 函数。
def speak_notebook(output_file):
    print(f"[INFO] Start reproducing response audio")
    display(Audio(output_file, autoplay=True))

def speak_script(output_file):
    print(f"[INFO] Start reproducing response audio")
    return_code = subprocess.call(["afplay", output_file])

speak_script(output_file)
示例输出
如果我们按照前面的所有步骤进行操作,我们应该准备好开始使用新的多语言虚拟助手。为了向您展示输出的外观,我录制了自己问 “什么是亚马逊网络服务?” ,您可以清楚地看到这正是 Amazon Transcribe 生成的成绩单,然后是 ChatGPT 提供的答案。
$ python3 ChatGPT-AWS.py
[INFO] Start of the recording
[INFO] End of the recording
[INFO] Recording saved on: audio/6032133a-ec26-4fa0-8d0b-ad705293be09.wav
[INFO] File has been uploaded successfully in the S3 bucket: 'chatgpt-transcribe'
[INFO] Starting transcription of the audio to text
[INFO] Transcribing text: *********
[INFO] Transcription completed!
[INFO] Transcript language: en-US
[INFO] Transcript text: What is Amazon Web Services?
[INFO] Sending transcript to ChatGPT
[INFO] ChatGPT answer: Amazon Web Services (AWS) is a cloud computing platform that provides a wide range of services, including computing, storage, and content delivery. AWS offers these services on a pay-as-you-go basis, allowing businesses and individuals to access the resources they need without having to invest in expensive infrastructure. AWS is widely used by organizations of all sizes, from small startups to large enterprises.
[INFO] Speaker selected: Joanna
[INFO] Response audio saved in: audio/168a94de-1ba2-4f65-8a4c-d3c9c832246d.mp3
[INFO] Start reproducing response audio
记得点赞哦
我希望你喜欢它,就像我在构建和使用这些服务时一样。我认为这些最先进的技术有很多机会/潜力,当我们将它们一起使用时,结果就是AWSome!
本文正在参加 人工智能创作者扶持计划
